
mrhookup
-
Posts
490 -
Joined
-
Last visited
Content Type
Profiles
Forums
Events
Store
Gallery
Everything posted by mrhookup
-

PS 8/6 pm
mrhookup replied to mrhookup's topic in Michigan Waters Fishing Reports - Salmon and Trout
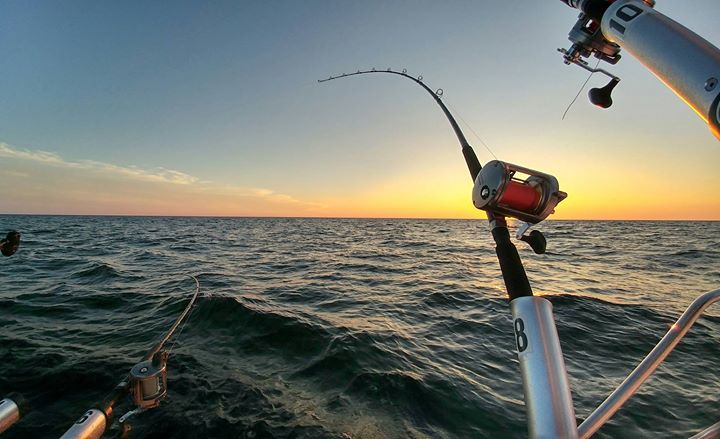
picture from the shakedown, she looks a lot smaller on the lake as compared to in the garage haha -
PS 8/6 pm
mrhookup replied to mrhookup's topic in Michigan Waters Fishing Reports - Salmon and Trout
Thanks Mike. The boat is the 16fter we've had for a long time, I just decided to fix it up and make some additions this summer to make it a little bit more comfortable to fish from. I detailed the whole process in my post in the "Boat Maintenance and Rigging" section of the discussion forums here. There's plenty of pics to check out. And hey if you've got some extra spawn you don't want than I won't mind taking some off your hands . -
Finally got the boat out for a couple hours for the shake down cruise after 3 months of hard work getting her redone and rerigged. Worked the 60-80ft depths straight out and to the south. Just ran our two riggers and didn't hit any fish but it everything worked perfectly and the engine ran very smooth. Now it's time to get serious about it . Probably should have stayed in closer by the pier heads as when we came in the water was ice cold on the surface compared to out deeper. mrhookup
-
I went 4 for 5 on skams off the south pier saturday morning, we had a pretty good number of large ales over on our side though.
-
cold water
mrhookup replied to fisf crazy's topic in Michigan Waters Fishing Reports - Salmon and Trout
from the looks of the web cam this morning and the water temps online I'd say it has and is still getting colder as the Northern winds continue . Beach temp went from 78deg yesterday morning to 64deg today, and that's literally right on the beach, it's plenty cold a few feet down in close now I'm sure. Hopefully I'll be out of Port Sheldon Sat. morning for the shake down cruise of my refurbished boat. -
Thanks guys. And you know it looks like they are forecasting N, E, and NW winds for the Grand Haven area starting tomorrow all the way through Sunday. My pier fishing instincts from the last few years tell me those fish are gonna be in close this weekend . Get ready boys, the kings are gonna be in the mud Oh and the boat's gonna need a name, any ideas?
-
Well gentlemen, I'm not gonna say I've got everything on the boat that I want to yet (i mean who ever really achieves this feat ) but all of the major additions that will change the appearance of the boat are on except for a pair of trees I'm planning on fabricating and adding later. It's been a while since I've updated on my progress and we've gotten A LOT done. I had a little lull there for a couple weeks where not much was accomplished, but the last 3 weekends have been VERY productive. We put in over 40hrs of work. I'll start with a few of the smaller items. First I mounted a cheap little battery operated tap light in the main compartment up front for some light. I then added a couple clears on the deck up front. We finished the bilge pump by running the hose up to a hole in the upper back corner of the boat. We tested it and I don't have the picture anymore but it shoots a very impressive stream a couple feet out the side of the boat. the inside the outside Next we added a total of 6 switches to the front dash of the side console. So far we only have 3 of them wired up to stuff. These include the bilge pump, the navigation lights and a pair of docking lights I mounting up front. The lights I used were truck navigations lights $15 for a pair at Meijer. the wiring, covered with plastic tubing and they work! The remaining 3 switches will be for interior lights, the permanent mount compass, and a pair of rear flood lights for netting fish in the dark. I have the compass and flood lights installed, wiring still to come... compass the rear flood lights on each back corner Next was the windshield, which gave me the most problems but I finally have it done. I dismantled it and painted it with a navy blue metallic color. Then I reassembled it in sections while adding the plexiglass which was actually a plastic sheeting I got at Lowe's. It's probably the least fun material I've ever had to work with. It's very hard to cut and drill holes into without cracking it. Then I also added a section of the black plastic tubing (that we're using to cover the wiring with) across the top with some silicon because I thought it looked good. I'm very pleased with how it turned out since I essentially used no power tools to build it. Next was the seats. I think I'll eventually add a hole mount up front for a removable seat on a pedestal but this probably wouldn't be used much while trolling anyways so it'll have to wait. I added two fold down high-back seats in a solid navy blue color that ended up matching the color of the transom and downrigger boards perfectly. I got these things brand new on closeout for $20 a piece! They are really comforable being high-backs. I added swivel mounts to the bottom of each seat which I got on sale at Meijer for $7 a piece. I then had to come up with an adapter that would attach to the bench seat that I could attach the bottom of the swivel mounts to. This was needed because there was a large enough gap between the two plates of the swivel mount to use a screw driver. You had to use through bolts and the inside of the bench seat is solid foam so you could get under the swivel mounts to attach them. But with adapter you could. The adapters were just 1/4" ply with a 1"x2" screw onto each edge, covered in finish and carpeted to match the decking and floors. The bottom of the swivel mounts were then attached to this with threw bolts. We then hammered the mounts into position on the bench and put in three 3" sheet metal screws in each edge (total of 6 per mount). It worked great, is a very stable mount, looks classy, and now I have two seat that swivel 360deg. the seats the mounting adapters yup they swivel Next was to figure out how to get the new downriggers mounted farther back behind the rear bench seat. I went back and forth with a few different ideas and what I decided to do worked great. I through bolted the board right to the gunnels with three 3/8" bolts on each end. We came up with a unique configuration for the board that saved weight without comprising on strength. I needed an 8" wide board so that I could mount the downrigger pedestals the way that I wanted. Well a 2" thick board was heavier than I wanted to we doubled up just the ends of a 1" thick board and then supported the middle with a 2"x3" turned on it's side and cut at an angle. This save some weight and is just as strong if not stronger. I also sandwiched the ends of the board with 1.5" x1/8" thick pieces of aluminum for added support and strength. I then dismantled and painted and clear coated with the same paint as the transom board so it matches. This configuration held my 12lb cannon balls with absolutely no flex in the mounting board at all. The whole unit is real sturdy. Here's what she looks like. the middle support the doubled up ends the attachment to the gunnels full view I also took the downriggers I got from Ben on here cleaned them up befor I mounted them on the board. I grinded all of the steel with a steel bristle brush wheel on a power drill to shine them up. I also removed the booms and painted them the same navy metallic blue color as the windshield frame. They looke real classy and unique now. I didn't replace the wire on them so they're a little short at 125' and 115' but they have brand new cannon terminal connectors for the weights. I mounted them at a slight angle toward the rear as opposed to straight out the side. This will them easier to crank up with the seat just in front of the board. riggers in storage position rigger in fishing position closeup That's pretty much it for now. I'll be upgrading the fishfinder, adding a permanent mount vhf radio to the dash with an 8' antennae, and custom rod trees in the future, probably this winter. Here's a few more wide view shots showing the whole thing. I have to say that when I stand back and look at the boat it's not exactly what I had envisioned...it's better. I'm really happy with it so far. The way the entire color scheme came together was better than I had even planned and the layout has made the boat really comfortable to move around in despite being a smaller boat. We also got the engine runnin good this weekend, but only in the garage . I can't wait to get it on the water now. The fish better be on the look out. tight lines
-
yeah i figured they looked like about 2ft per crank with that large spool, but mine have counters anyways. i use to have a pair of smaller short arm walker manual that only took up a foot of line per crank, man were those a pain in the butt for my dad to crank up from the depths back in the day
-
another quick question guys, how much is the parking pass at the Port Sheldon parking lot now? I know Grand Haven is $10. Oh and Jeff, just watched one of your videos and I have the exact same downriggers, got my Rivieras from BenLubbs. I think our setups will end up being very similar, thanks for your help so far.
-
Haha yeah at the moment I only have the one rod holder on each rigger unfortunately. Like I said though I'm itching to get out so I probably won't wait until my additional holders are done:D. BTW, I'm gonna be fabricating some 3 holder trees with the bottom holder set horizontal for dipseys and the top 2 at angles for boards, much like Nailer has done. I think this will kill 2 birds with one stone because between the riggers and the driving seat there is really only one good spot to mount a holder and not much room period. So I think combo trees like this will be very versatile and allow me to create a wide variety of spreads. I don't think I'll ever want to run more than 1 dipsey per side on this thing anyways. We'll see. Thanks for all the input guys! Now I wanna get out there even more haha
-
and yes I was planning on using sliders. I figured I'd start with a couple glow spoons with no sliders for the first hour for the low light bite, then switch them out and add sliders along with the new baits.
-
thanks for the info so far guys, and remember more rod holders are going to be making there way onto the boat, i plan on running a spread of 6 rods when they make it on the boat, it's be hard to run more than that with this boat unless you had a lot of high line boards while fishing in shallow in the spring, besides it'll probably just be two people on the boat most times unless were planning on staying in close. keep that advice coming!
-
Ok so I've been working on my smaller 16' boat all summer. It's finally ready enough to take out for it's first trip in a number of years. The only thing is that when I say it's ready "enough" well so far it only has 2 riggers set up on it and no other rod holders. And this doesn't really bother me to fish with just 2 downriggers for a few trips as that was how my dad fished with me growing up. So my scenario is... If you were gonna fish out of Port Sheldon this weekend or next what would you put down if all you could run was 2 riggers? And I know conditions are different everyday but where would you probably start fishing? I'd like to hear some opinions for both evening and morning trips.
-
Great report Tim, I love those extra little details, keep em coming!
-
All I can say is that I think seeing alewife dieoffs again is a greeeaaat sign:thumb:
-
Holland 6-29
mrhookup replied to DIRTY DOG's topic in Michigan Waters Fishing Reports - Salmon and Trout
nice steelhead! they're catching a number of large ones off the piers so far this year also -
So this one is gonna be a little picture heavy guys. Last weekend I didn't really get a chance to touch the boat much but this weekend my buddy Jake was finally able to come over and we were able to get A LOT done. The windshield frame is removed for now so that a part of it can be welded before it is finished. A couple of the smaller things we got done were to install the navigation light on the bow, add a clear coat to the transom board, mounting the clips to the transom board to store the stern light when not in use, and mounting the bildge pump the the support brace in the back. Here's what that stuff looks like... the navi light the transom board now clear-coated and tape removed with the storage clips for the stern light the bilge pump mounted And now the big part and probably the coolest portion of the whole project we were able to finish this weekend. That includes the front deck and floor boards. All the hatches were finished with Gatehouse hinges and bolting latches. The carpet isn't marine carpet but instead a plastic type that's made for outdoor use. I really like the color of it, it cleans off easily with a hose, and won't rot with time. Should be very durable. I think we got as much storage space as we could with no wasted space while keeping it stylish as well . So the front deck was built in two pieces as i think i said before. It has 3 compartments and the back 2/3 of the whole thing hinges up for a large storage area. Here's what she look's like. 3 compartments open front compartment close-up the other two are made from platic bins the handle to lift the deck up deck raised up, supported with a aluminum tube with rubber caps side view of deck hinged up We also did the other two floor boards. The floor in the middle section of the boat with the console has a compartment running lengthwise down the middle. hatch open The back floor has no compartments as there wasn't as much room under the floor so it's just a simple one. All in all a very productive weekend. It's turning out nicely. I can't wait to use it late summer for some staging kings
-
So I didn't get as much done this weekend as I'd hoped. My buddy Jake was busy with family stuff at his cottage all weekend so I couldn't get the carpet on this weekend (he has the staple gun ). So I worked on what I could which included putting three coats of a nice dark blue paint on the transom board to reseal it (will add clear coat next weekend) and attaching a cup holder to the side of the console. the paint job... (tape still has to be removed after clear coat is applied, that's the lighter blue stuff) the cup holder is a black plastic one from the trucking accessories section at Meijer that I got for $5. I also removed the two short arm manual Walker downriggers we had mounted to the oarlock holes. These things caught a lot of fish at one time but they will be replaced with a set of manual long arm Rivieras I picked up from BenLubbs (thanks again Ben! they're gonna work perfect). They will be mounted to an aluminum flatbar that will extend across the span of the boat on the gunwales and be farther back. This will open up more room with the longer arms set farther back and allow the oar lock holes to be set up with more rod holders for dipseys, cores, coppers, etc. the now empty oarlock mounting holes... I also put in the mount for the stern light (wiring to come later)... And lastly the cool part that I worked on this weekend which took up most of my time due to the lack of tools I had to work with. I fabricated this windshield frame from 1/16" thick 1" aluminum angle stock and 1/16" aluminum flatbar. All connections are with 3/4" 6/32 machine screws and nylon insert lock nuts except the connections to the console are with #10 sheet metal screws. I did the whole thing with nothing but a hack saw, hand drill, hand file, and tape measure. I still have to have my neighbor put a weld line to connect the two front support bars together as they are sitting at about a 60deg angle, that should really strengthen it good. Now I just have to cut to shape and add the plexiglass inserts and then I will dismantle it and paint the frame a nice dark blue to match the transom board. It's gonna be sweet! driver's view...
-
Holland 5/30/11 am
mrhookup replied to BenLubbs's topic in Michigan Waters Fishing Reports - Salmon and Trout
great job ben! -
sounds good
-
Well the guys I was going to get the 12lb cannon balls from only ended up having 1 but he had a pair of 14lb for the same price so I took them. I think they'll be a good solid weight. And Mike how does next weekend look? You think the fishing will still be on even though it's the first weekend of June?
-
do you have a link to what these rubber mounts look like? thanks
-
Yup that's mine, I'm gonna work on some ideas this weekend to see if I can make an 8' antenna work
-
What do you guys think would be better, 10lb shark weights or 12lb finned cannon balls? I've got a chance to get a pair of either for the same price. Do you guys think the sharks would run just as deep as the cannonballs easier because of less blowback? thanks, mrhookup
-
for a permanent mount vhf then I need an antennae. It seems like 8ft is a pretty standard size. Is one this large necessary or would something smaller like either of these still give you enough transmitting power/range http://www.boemarine.com/products/5216/shakespeare-vhf-15in-5216-ss-black-whip-antenna---bracket-included http://www.boemarine.com/products/5215/shakespeare-5215-3--stainless-steel-whip-antenna thanks