

HONDAM
-
Posts
158 -
Joined
-
Last visited
Content Type
Profiles
Forums
Events
Store
Gallery
Posts posted by HONDAM
-
-
We have a couple Furuno units on sale. Had a customer order then and want able to take them so we are blowing them out. They are brand new in the box units that have never been powered.
Furuno 1834 C/NT (10.4" Navnet display with 24" 4kW radar)- $3566.00
Furuno FCV 627 (New unit replaced the popular FCV-620) - $696.50

-
Ive used them many times at were im working down in TN
Calumet Marine probably has a good used one and will ship you one. I know this because I just had a 70hp lower shipped to me. Frank also has a place near eau Claire and can meet you (I don't know were berville is).
A couple things to make sure that you know, it does not come painted and it does not come with a drive shaft shift shaft or water pump. You have to remove the upper drive shaft from your old unit and install it into the SEI unit and make extra sure you get the shift shaft in the exact same spot by counting the turns till it bottoms out, because if you don't have the measuring tool and spec you could be in for a nightmare trying to get everything synced back up. Also painting those SEI lowers can be kind of a pain. Make sure to clean it thoroughly and I even put an extra layer of zinc primer to make sure it sticks good and is smooth because there primer sucks. But don't let the criticisms deter you because it is overall a good value, just letting you know what to watch out for.
FYI - 1992-2005 Evinrude Metallic Blue paint Part Number - 777175
-
The min recommended for most V8 Mercruisers is 550cca and 700mca so your good. The older carbureted mechanical fuel pump models require even less but is you have at least what I mentioned you are covered.
-
Depending on the Manufacture of the Tachometer
1 - Outboard
2 - 4 cyl I/0
3 - 6 cyl I/0
4 - 8 cyl I/0
I am sorry but this is NOT accurate. Depending on the different types of charging and ignition systems all outboards do not operate on the same setting. The I/O section could work, I don't know to tell you any different but im positive about the outboard.
-
Its a trial and error thing is probably the easiest way to do it. You could waste a bunch of time trying to find somewhere to look it up or you could start up the motor and listen to the motor and try each position till you find the one that best fits your engine. I've installed dozens of those tachs and I just leave it at idle and choose the position that will give me about 600 to 800 rpms then rev it up and see if it acts appropriately.
Each change in position will about double the rpm reading on the gauges so its actually pretty obvious and takes just a few seconds.
-
Ed...your right about the TWIC card not being required...but I do know the Coast Guard licensing center in West Virginia asked for a current issue photo copy of it when I did my license renewal this last February....So its kind of like you don,t need it from local Coast Guard people but need it for license renewal...go figure I guess....We,ve talked about this at MCBA board meetings and still do not have a 100% firm answer from Coast Guard officials .
I called the national maritime center when I was fulfilling my application and their answer is posted above. When I got my license they already had repealed the TWIC card requirement for renewals but I still needed to apply. This was as of spring 2012 when I got my license for the first time.
-
If you getting your captains license for the first time you need to at least apply for the TWIC and its up to you if you want to go pick it up because your not required to hold the card. The purpose of that is when you apply for the TWIC card they do an interview and background check as well as fingerprints and want to have all that on file.
-
Two years ago I went through the process of obtaining my captains license. What I didn't know the cost of the course is only the beginning of the costs associated with the process of getting all your paperwork in line. So I thought id share for all of those considering so your not surprised like I was.
The course I signed up with was with Mariners Learning System and was a self study program that I was overall happy with and would recommend. The cost of the course is:
6 Pack License - $595
Masters Upgrade - $325
1 day off work and a hotel and a 4 hour drive each way for testing (Hotel and gas $150)
Because of a paperwork mistake on my part I had to retake the Masters portion so I decided to just do the towing endorsement since I had to go back to the testing center again anyways. Since this particular testing location was near my parents and I was going to see them anyway no travel expenses were figured.
Towing - $125
1 more morning of testing
You need a red cross first aid and CPR card there was a center about an 45 min away offering coarse.
Red Cross Enrollment Fee $90
Its about a 6 hour class so plan taking time off work and for me about another $20 in gas
I got a steal on a physical and drug testing from a local clinic
Physical and Drug testing - $55 TOTAL, great deal you probably couldn't find everyday.
For the TWIC card my closest center was 4 hours away and you need to go there twice
TWIC processing fee $131
2 days off work 16 hours in the car between the 2 days and about $120 in gas ( I get great mileage in my cavalier)
I had to have a notary administer the oath
Notary $15
Finally the USCG processing fee once you have everything done to actually get your license
USCG processing fee $145.
Everything totaled out to be over $1700 and more then 5 days off work since I work Monday thru Friday and cant do any of it on my days off. Not everyone will have the same expenses but I was very surprised how it all added up.
-
DO NOT TAP INTO 24 VOLT BATTERIES TO POWER 12 VOLT. There are all kinds of electrical issues that can arise and several industry standards strictly prohibit this without the use of a 24 to 12 volt converter which is expensive. I don't know that your Lund is 24 volt or not but I'm guessing it probably is.
Also it is very important to fuse the power line going to the rigger. The breaker on the rigger is only to protect against an internal failure. And will not protect against a short in the boat, and that is a big safety issue.
The way that I do it is to use electric trolling motor plugs for disconnects because I like to be able to remove my riggers. Then I run appropriate size wire to a breaker or fuse panel that is connected to the house battery. I usually have a vsr isolating and maintaining my house circuit from the starting circuit.
-
I don't actually work at the store, I'm franks son living down in TN. From what I understand that location isn't really working out. But you can call frank and see if there is something you can work out.
Do you already have a nmea 2000 network?
-
The best way to go in this case is aftermarket. Maretron sells a cable (MARE-003) for about $95 that will do what you want it to do. If you want OEM the gateway module is $235 and does less then the Maretron cable
-
Yes all you would need is the NMEA 2000 gateway which will plug into that extra spot on your I command hub. Ill post a part number when I get home later tonight.
-
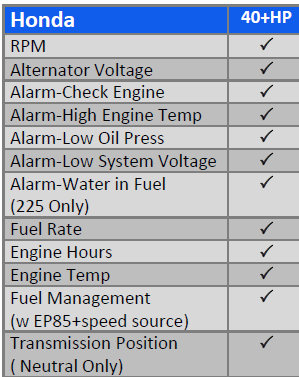
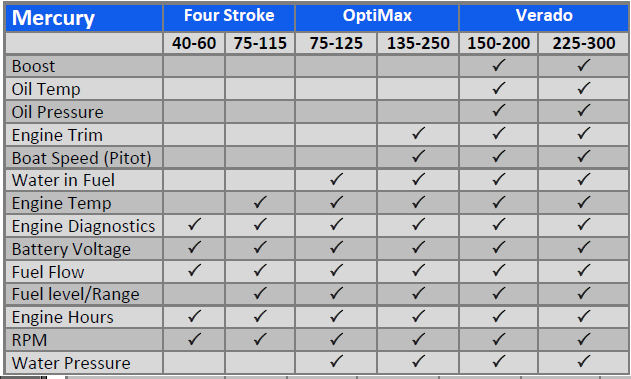
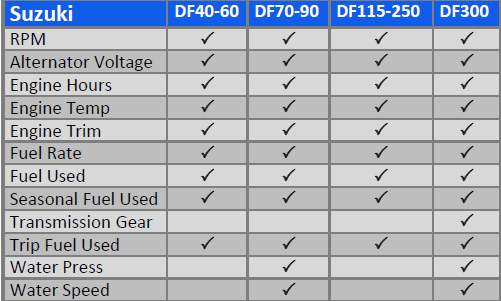
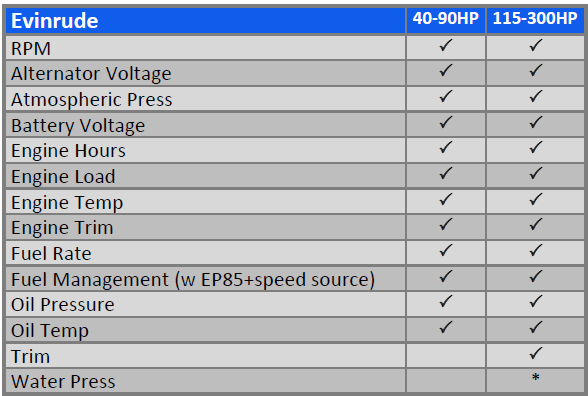
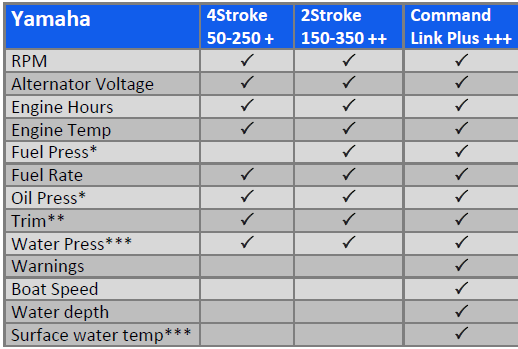
Connecting your engine to your GPS can provide you with much more information then just the traditional gauges on your dash. It can alert you of problems well before any lights or alarms, automatically keep track of the rate and how much fuel your using, also all the information that you normally see then a on gauges which is especially helpful if you only have room for 3 or 4 gauges.
Most engines 2006 or newer are capable of this although some are much easier and less expensive then others. Honda, Evinrude, Yamaha and Suzuki in most cases only need a cable and can be acomplished for under $100 (plus NMEA backbone about $50 if you dont have one). Mercury requires smartcraft and if you dont already have it is about $600, if you have smartcraft its just a cable again.
Here is an example of what it looks like on a Lowrance but this can be done on any NMEA 2000 compatible device witch is any HDS, Most Garmins, Most raymarines with seatalk adapter, and most Humminbirds 700 series or better

Below is a list of infomation provided by each engine
-
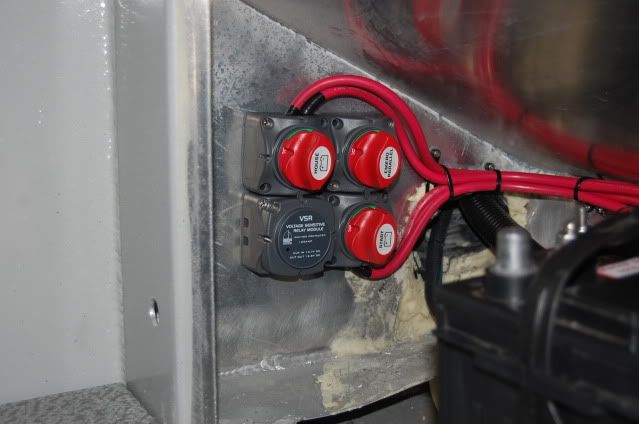
Best and easiest solution in my opinion to solve what you are looking to do, install a 4 way battery switch (Off-1-2-Both). IT will tidy up your wiring and give you the option to change how your using your batteries with a flip of a switch.
Also if your running batteries in pairs they should be of similar age and composition (Twins if possible) if you want to get the most out of them as far as longevity and performance.
When installing the switch put all of your load on the common terminal, and a battery on each source post. Make sure to run a cable to each neg terminal on the batteries to establish a common ground.
When attaching your loads to the back of the battery switch it is recommended that no more then 4 connections be made at any one terminal. Therefore it would be best to install a power post or buss bar with a short lead to the switch to provide an adequate and reliable connection. Trying to put all those wires on the back of the switch is a common mistake and which both can make it a pain on yourself trying to maneuver all those wires and get the switch secured down and connection reliability suffers.
Notice how I wired this switch only 4 wires going to it with 2 going to batteries and 2 going to distribution points.
-
I have not seen a 70# 12v trolling motor. If it is a 70# Powerdrive V2 it is most likely 24v. If this is the case the trolling motor needs to be the only thing on those batteries and they need to be wired in serires. It is possible to power other things off of them but your asking for electrical issues and NMEA regulations strictly prohibit this without the use of a 24v to 12v converter which are pricey.
So confirm what voltage your electric trolling motor is and if you do have all that other stuff wired to those batteries and your trolling motor is 24V, the Humminbird, trollmaster, downriggers, and whatever else you have wired in the bow there needs to be redone to the battery in the back.
-
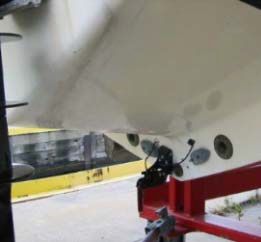
All boats are different and a lot of the time its hard to tell someone exactly where to mount a transducer with actually seeing the back of the boat with your own eyes. Although below are some general guidelines and pictures to help get the best results out of your next installation. With the exception of the drawing the rest of the guidelines apply to standard transducers and not the structure scan.
Below is the drawing of the back of a boat prime areas highlighted.
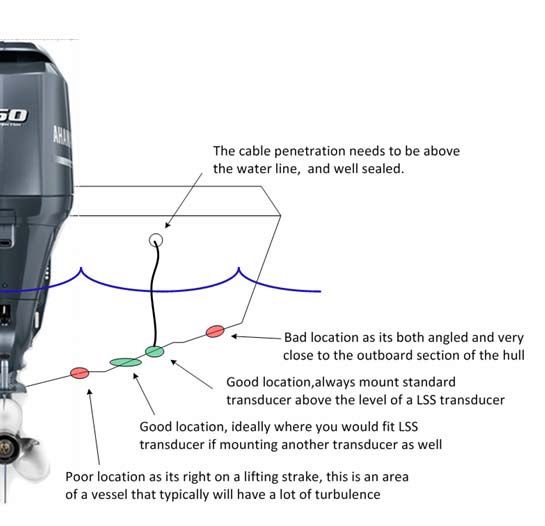
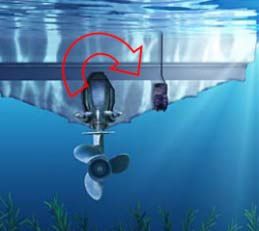
1. The first tip that i have is mount the transducer on the Starboard side if possible. Since 95% of outboard engines sold are clockwise turning this means the turbulence from the propeller will impact the top of the transducer and not the bottom were the sensors are.
2. Some of us have obstructions on the bottom of the hull like repaired fiberglass, thru hulls, and drain plugs, never mount the transducer in lines with these obstructions.
3. Have a small amount of tail down on the transducer (2-5 degrees) this will help provide a clean flow of water across the face of the transducer.
4. If possible take the boat for a ride with a friend and carefully take a look over the back and note areas of smooth flowing water that would be prime mounting locations. If you have a stepped hull you wont be able to see this.
5. Remember to account for the trailer and lifting points
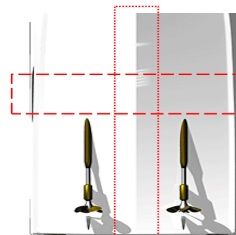
6. For stepped hulls the transducer must be mounted on the first step.
-
A good autopilot will steer better then most people can with gyroscopic sensor, accelerometers, and magnetic heading sensors they will sense the boat moving well before a person especially when they are paying half attention the the compass and half to the rods. And different autopilots have different number and quality of sensors and different computers and software to be able to interrupt and utilize that data the is what makes the difference a lot of the times between a $1200 autopilot and a $3000 one.
-
I'd say price range is around 1500 or less of course. Currently we have a 10" screen so it needs to be at least 7".
Well there are two options, one bust the bank a little bit and get the new Garmin 741xs with CHIRP. That would be by far the BEST sonar that anything even close to that price range, this unit just blows everything away at anywhere near that price. It has the new HD ID sonar and CHIRP compatibility which before now has been a $3000 add on to much more expensive units, but Garmin has just released this unit this month with has Chirp built in and you can get the unit itself for under the $1500 mark but then have to add a $200-$300 TM150 CHIRP transducer.
If that budget is really rock solid then take a look at the Garmin 740s which will put you $500 under budget or the Raymarine E7d which is a little bit more money then the Garmin (and I personally believe the Garmin is the better unit for the money) but some people prefer the Raymarine and it does have a few more features.
-
main difference is networkability and features. The Elite does not have the Ethernet ports on the back so a bunch of the add ons wont work like structure scan, radar, networking multiple screens together. Need an HDS to do that.
Also take a look at the Garmin 740s. Price between the Elite and HDS, can still add radar, touchscreen, and one awesome unit and would be my choice for a 7" unit for trolling.
Both are available from Calumet Marine (site sponsor)
http://calumetmarine.3dcartstores.com/
Don't see something on the store just let me know and ill get you a price.
-
Calumet Marine (site sponsor) carries them packed with the P70R.
http://calumetmarine.3dcartstores.com/SPX-5-Autopilot_p_447.html
We've installed a bunch of them. Its a pretty good entry level autopilot.
The Garmin GHP-10 is the best autopilot out right now but runs about $2700 and need hydraulic steering.
-
I see what your talking about and let me double check on that, their charts seem to be pretty universal and I find it odd that this unit would be left out as far as compatibility. The Garmin Lakes Vision chip will work for less money then this but this LakeVu Ultra chips detail just looks ridiculous.
UPDATE: Looks like you were right, the maps are not the reason for the compatibility issues its some of the more advanced features that are included on the chip along with the maps. At least that is what my Garmin guy told me and he has a call into the lady that does the cartography and chip programming to confirm with her as well because he wasn't 100% sure also.
-
The Elite-7 does have NMEA2000.
The big thing that the Elite-7 does not have that the HDS series does is Ethernet. Ethernet give you the ability to expand on what you have with Radar, Structure Scan, CHIRP sonar, and Link several units together and share all the information.
So the big question is what are you going to do with it? Are you always going to have 1 unit and no desire to ever add Radar, Structure Scan, or CHIRP sonar? If that is the case then go with the Elite-7, if not then it will save you some money in the long run to bite the bullet and get an HDS.
Let me know which way your leaning and ill make sure you get the best price while supporting a board sponsor (Calumet Marine).
-
That unit does not supposed to have inland lakes on it although the do put some on there. The chip you are looking for is the Garmin LakeVu HD Ultra North Central. Its not out yet but I think they said it will be here first part of may.
As low as 1ft contour lines for many lakes.
-
This year is a transition year, all dealers are going to be grandfathered in. It's to give dealers time to complete the new required training, but if they don't complete it by 2014 they can still stay a dealer just won't be certified. Although I wouldn't expect a lot of dealers to have much information, because its so new. Calumet Marine was the first dealer in the US to complete the training and to be certified and it was only because we reached out seeking the information and were taking the test along Navico employees rather then other dealers.
Prop Pitch and WOT Question
in Boat Maintenance and Rigging
Posted
Same number of blades and same material?